Redis Study Note – single 인스턴스 설치
Redis single instance를 다음과 같이 설치해 본다.
* OS : CentOS 6.8 / VirtualBox
* Redis 버전 : 3.2.3
공식사이트
Redis 공식 사이트 : http://redis.io
다운로드
2016/9/16현재 최신 stable버전인 3.2를 다운로드 한다.
설치
공식 사이트에 안내된 바와 같이, 단일 인스턴스 설치 과정 자체는 무척 간단하다.
$ wget http://download.redis.io/releases/redis-3.2.3.tar.gz
$ tar xzf redis-3.2.3.tar.gz
$ cd redis-3.2.3
$ make
이대로 설치를 진행하면, gcc부터 시작하여 여러 라이브러리가 없다고 줄줄이 에러가 발생한다.
README.md파일을 읽어보면, 의존성 라이브러리들이 deps 디렉토리에 존재한다는 것을 알 수 있다.
일단 다음과 같이 실행한다. (추후 다른 라이브러리들도 필요할 것 같아, 일단 epel-release도 함께 설치하였다.)
$ yum install epel-release
$ yum install gcc
설치시 의존성 문제가 발생하면, 아래와 같이 초기화하고 다시 설치해 본다.
$ make distclean
정상적으로 설치를 마쳤다면, 다음과 같은 메시지가 눈에 띌 것이다.
Hint: It's a good idea to run 'make test' 😉
테스트를 실행해보면, 이번에는 tcl을 설치하라고 한다.
$ yum install tcl
tcl을 설치 후, 이제 make test를 실행하면
$ make test
수많은 테스트를 알아서 수행한다.
Execution time of different units:
  1 seconds - unit/type/incr
  1 seconds - unit/printver
  2 seconds - unit/auth
  2 seconds - unit/keyspace
  0 seconds - unit/quit
  3 seconds - unit/scan
  2 seconds - unit/multi
  7 seconds - unit/protocol
  11 seconds - unit/expire
  23 seconds - unit/type/list
  11 seconds - integration/aof
  4 seconds - integration/rdb
  3 seconds - integration/convert-zipmap-hash-on-load
  2 seconds - integration/logging
  1 seconds - unit/pubsub
  2 seconds - unit/slowlog
  46 seconds - unit/aofrw
  51 seconds - unit/other
  1 seconds - unit/introspection
  57 seconds - unit/type/hash
  2 seconds - unit/limits
  58 seconds - integration/replication
  7 seconds - unit/introspection-2
  19 seconds - unit/scripting
  10 seconds - unit/bitfield
  72 seconds - unit/type/string
  81 seconds - unit/type/set
  38 seconds - unit/bitops
  96 seconds - integration/replication-2
  102 seconds - unit/type/zset
  63 seconds - unit/maxmemory
  117 seconds - unit/dump
  127 seconds - unit/sort
  58 seconds - unit/memefficiency
  121 seconds - integration/replication-psync
  86 seconds - unit/geo
  156 seconds - unit/type/list-2
  159 seconds - unit/type/list-3
  155 seconds - integration/replication-4
  160 seconds - integration/replication-3
  92 seconds - unit/hyperloglog
  114 seconds - unit/obuf-limits

\o/ All tests passed without errors!

Cleanup: may take some time... OK
make까지 성공했으면 src/redis-server로 실행가능한 상태가 되었을 것이다.
아래와 같이 실행하면, /usr/local/bin에 redis-server, cli 파일 등이 복사된다.
$ make install
환경설정 파일 등의 절차를 쉽게 하도록, utils/install_server.sh를 실행한다.
포트, 로그 위치, config에 관련된 정보/ 위치에 대해 물으나, 기본 설정으로 모두 그대로 enter를 쳤고,
executable의 위치는 다른 가이드에 나온대로 기본 인식이 되지 않아, /usr/local/bin/redis-server를 직접 입력하였다.
redis 기본 포트가 6379라, /etc/init.d/redis_6379 파일이 생성되었다.
아래의 명령어로 서비스를 시작/ 정지시킬 수 있다.
$ service redis_6379 start
$ service redis_6379 stop
redis가 정상적으로 떠 있는 상태라면,
$ ps -ef | grep redis

root     22694     1  0 00:25 ?        00:00:05 /usr/local/bin/redis-server 127.0.0.1:6379
이제, redis client로 접속하면,
$ /usr/local/bin/redis-cli

127.0.0.1:6379>
와 같이 접속 상태가 안내되고, 다음과 같이 기본 동작 상태를 확인할 수 있다.
27.0.0.1:6379> set test 1234
OK
127.0.0.1:6379> set name "abc def"
OK
127.0.0.1:6379> exists name
(integer) 1
127.0.0.1:6379> get name
"abc def"
127.0.0.1:6379> get test
"1234"
커맨드라인에서 Maven/java 웹 프로젝트를 Tomcat에 배포하려면?
java 웹 애플리케이션을 Tomcat에 배포하려면 여러 가지 방법이 있다.
1. 웹 애플리케이션 디렉토리 전체를 webapps 밑에 직접 복사하거나,
2. 웹 애플리케이션 디렉토리를 압축한 WAR 파일을 webapps 밑에 직접 복사하거나,
3. Tomcat의 매니저 웹 GUI를 통해, WAR 파일을 배포할 수 있다.
그러나, 직접 특정 디렉토리에 복사하는 방법은 무엇보다 번거롭다.
Tomcat의 매니저 웹을 통해 배포하는 것은 쉽지만, 자동으로 배포를 하고자 한다면 매번
사용하기 어렵다.
다음과 같은 경우, Cargo라는 프로그램/ 플러그인을 사용하면 좋을 것 같다.
1. 커맨드라인으로부터 웹 애플리케이션을 배포하고 싶다.
2. WAS가 로컬/리모트로 접근 가능하다.
3. Ant/ Maven을 사용하고 있다.
4. WAS가 다른 것으로 대체될 가능성, 혹은 서로 다른 WAS가 내 웹 애플리케이션에 혼용될 수도 있다.
5. 그러나, 동일한 방법으로 웹 애플리케이션을 여전히 배포하고 싶다. (커맨드라인으로부터)
Cargo에 대한 정확하고, 자세한 정보는 무엇보다 공식 홈페이지(http://cargo.codehaus.org)를 참조하는 것이
바람직하다.
홈페이지의 What is CARGO?란에서는 다음과 같이 Cargo를 소개하고 있다.
Cargo is a thin wrapper that allows you to manipulate various type of application containers
(Java EE and others) in a standard way.
주목할 만한 것은 결국, various type of application containers in a standard way라고 보면 될 듯 하다.
* Cargo가 지원하는 Containers
– Geronimo 1.x ~ 3.x
– Glassfish 2.x ~ 4.x
– JBoss 3.x ~ 7.4.x
– Jetty 4.x ~ 9.x
– Jo! 1.x
– JOnAS 4.x ~ 5.x
– JRun 4.x
– Orion/OC4J 9.x ~ 10.x
– Resin 2.x ~ 4.x
– Tomcat 4.x ~ 8.x
– TomEE 1.x
– WebLogic 8.x ~ 12.1.x
– WebSphere 8.5.x
– WildFly 8.x
* Standard way = Cargo의 사용법 + container 별 설정
앞서 언급한 다양한 WAS들은 결국 몇몇 property를 선언하는 환경 설정의 문제로 국한된다.
본 글에서는 Maven 기반 웹 애플리케이션을 Tomcat7에 배포하는 설정을 간단하게 적어보고자 한다.
1. Tomcat 설정
Tomcat에는 기본적으로 권한 및 룰이 등록되어 있지 않기 때문에 Cargo를 사용하여 웹 애플리케이션을 배포하려면
그에 필요한 내용을 선언해야 한다.
Tomcat의 설치 디렉토리를 $CATALINA_HOME이라 할 때, $CATALINA_HOME/conf/tomcat-users.xml을 편집하여,
다음의 내용을 추가한다.
<role rolename="manager-script" />
<user username="deploy" password="deploy" roles="manager-script" />
GUI 기반이 아닌, CLI 기반으로 제어하기 위해, tomcat에 manager-script 롤을 선언한다.
배포에 사용할 계정 및 패스워드를 선언하고 (위의 예에서는 deploy/deploy), 이 계정에 앞서 선언한 manager-script 롤을
부여한다.
2. Maven 설정
Cargo 홈페이지상의 Downloads 탭으로부터 다운로드를 받을 수도 있으나,
Maven 기반으로 설정할 경우는, 본문에 표기된 바와 같이
If you want to use Cargo from Maven 2 or Maven 3, you don’t need to install anything at all as Maven will automatically download the required jars when you first use the plugin.
저절로 복사가 된다고 하였으나, 저절로 복사가 되도록 설정을 해줘야 한다.
http://repo1.maven.org/maven2/org/codehaus/cargo/cargo-maven2-plugin
에 접속하여 확인하면,
2014/7/28에 배포된 1.4.9가 이 글을 작성하는 시점 기준으로 가장 최신버전이다.
본 글은, 예전에 1.2.4로 테스트 환경을 구축한 것을 바탕으로 작성하였기에, 아래
설정에는 1.2.4로 기록하였다. (1.4.9로 적어도 동일하게 동작할 것이라 예상한다.)
pom.xml에 cargo-maven2-plugin 설정을 하자.
<plugin>
	<groupId>org.codehaus.cargo</groupId>
	<artifactId>cargo-maven2-plugin</artifactId>
	<version>1.2.4</version>
	<configuration>
		<container>
			<containerId>tomcat7x</containerId>
			<type>remote</type>
		</container>

		<configuration>
			<type>runtime</type>
			<properties>
				<cargo.remote.uri>http://tomcat_ip:tomcat_port/manager/text</cargo.remote.uri>
				<cargo.remote.username>username</cargo.remote.username>
				<cargo.remote.password>password</cargo.remote.password>
			</properties>
		</configuration>

		<deployer>
			<type>remote</type>
			<deployables>
				<deployable>
					<groupId>com.luran</groupId>
					<artifactId>jsweb</artifactId>
					<type>war</type>
					<properties>
						<context>/jsweb</context>
					</properties>
				</deployable>
			</deployables>
		</deployer>
	</configuration>
</plugin>
– cargo.remote.uri 에 Tomcat manager 주소를 http://ip:port/manager/text로 기록
– cargo.remote.username에 배포를 위한 계정 기록
– cargo.remote.password에 배포를 위한 계정의 비밀번호 기록
– deployable이하 내용에는 어떤 war로 배포할 것인지 (maven 형식) 기록
– properties~context에는, servlet context 명 기록 (본 예제에서는, http://ip:port/jsweb으로 배포함)
3. Maven을 통한, 웹 애플리케이션 관리
– deploy
mvn cargo:deploy
또는
mvn cargo:deployer-deploy
– undeploy
mvn cargo:undeploy
또는
mvn cargo:deployer-undeploy
– redeploy
mvn cargo:redeploy
또는
mvn cargo:deployer-redploy
4. 자동 배포 응용 (빌드 서버 또는 스크립트 상)
mvn clean install package cargo:redploy
이와 같은 식으로 작성한다면, 빌드까지 모두 한 후 Cargo를 통해 Tomcat으로 웹 애플리케이션을
자동 배포할 수 있다.
PPAS에서 Oracle로 DB Link 연결하다 겪은 에러 – ORA-21561 : OID generation failed
PPAS에서 Oracle로 DB Link를 연결하였고,
연결한 상태에서
SELECT * FROM xx@ora_link;
와 같이 실행했는데,
ERROR:  OCI error: ORA-21561: OID generation failed

********** Error **********

ERROR: OCI error: ORA-21561: OID generation failed
SQL state: 25000
와 같은 에러가 발생하였다.
문제를 확인하기 위해,
SQLPlus를 사용하여 동일한 문제가 발생하는지 다음과 같이 확인하였다.
sqlplus username/password@servicename
그랬더니, 동일한 에러가 발생하였다.
결국, PPAS 자체의 문제가 아니라 Oracle client가 접속할 때 생기는 문제.
인터넷을 찾아보고 다음과 같이 조치/ 해결하였다.
hostname
를 실행하여, 호스트이름을 확인한다.
/etc/hosts내에 다음의 내용을 추가한다.
127.0.0.1 localhost 호스트이름
그 후, sqlplus로 접속 시도를 했더니 정상적으로 연결이 되었으며,
앞서 생성한 DBLINK를 통한 연산도 정상적으로 수행되었다.
Eclipse/STS에서 maven 프로젝트 UTF-8, JDK 버전을 매번 해줘야 하나?
Eclipse/STS에 사용중인 maven project로부터
1. 프로젝트를 새로 import할 때
2. Disable Maven Nature + Configure > Convert to Maven Project를 할 때
인코딩이 MS949로 자꾸 바뀌어서 수동으로 UTF-8로 바꿔줘야 했다면?
또 JDK 버전이 자꾸 1.5로 바뀌어서 수동으로 JDK 버전을 상위 버전으로 바꿔줘야 했다면?
다음의 옵션을 pom.xml에 추가해 보자.
pom.xml 파일 윗쪽에
<properties>
	<project.build.sourceEncoding>UTF-8</project.build.sourceEncoding>
</properties>
와 같이 이 프로젝트는 UTF-8 인코딩이라고 선언해 주자.
pom.xml의 build 부분에 (없다면 추가로 써주면 된다)
아래와 같이 maven-compiler-plugin 선언을 하고, 사용하고자 하는 JDK 버전을 명시한다.
<build>
	<plugins>
		<plugin>
			<artifactId>maven-compiler-plugin</artifactId>
			<configuration>
				<source>1.7</source>
				<target>1.7</target>
			</configuration>
			<version>2.3.2</version>
			<executions>
				<execution>
					<id>default-testCompile</id>
					<phase>test-compile</phase>
					<goals>
						<goal>testCompile</goal>
					</goals>
				</execution>
				<execution>
					<id>default-compile</id>
					<phase>compile</phase>
					<goals>
						<goal>compile</goal>
					</goals>
				</execution>
			</executions>
		</plugin>
	</plugins>
</build>
이렇게 해서, SCM에 commit 하면, 새로 프로젝트를 import 할 경우와,
Maven Feature를 껐다 켤 때에도 인코딩과 JDK 버전이 설정한 대로 유지된다.
OpenVPN-AS와 Google Authenticator/ Authy 연동 설정하기
알고보니, OpenVPN-AS의 경우 Google Authenticator/ Authy 연동을 쉽게 할 수 있었다.
Authentication 메뉴에
– General
– PAM
– RADIUS
– LDAP
가 있길래, RADIUS 혹은 PAM으로 할까 했는데,
의외로 메뉴가 숨어 있었다.
Configuration > Client Settings 메뉴로부터
설정 가능하다.
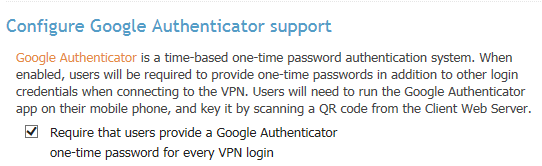
과 같은 체크박스가 있고, 체크해 주면 된다.
그리고, VPN 서버에 반영 혹은 재시작 시키자.
이것만으로는 접속시 OTP를 사용할 수 없다.
(아직 OTP 등록도 하지 않았으니까)
기존에 OTP 설정 전에 받아 놓은 opvn 프로파일을 사용하여 VPN 접속을 시도하면,
OTP를 묻지도 않고, 기존 방식과 동일하게 인증하고 접속시켜 버린다.
OTP 설정을 위해, 처음의 절차를 다시 밟자.
클라이언트로부터 https://주소:943을 접속해보면, 이전과는 다른 화면을 볼 수 있다.
ovpn 프로파일을 받는 부분 하단으로, google authenticator 안내문과
QR코드 그리고 직접 입력할 경우를 대비한 코드가 보일 것이다.
이 정보를 활용하여, QR코드로 찍든 코드를 직접 입력하든 선택하자.
이 단계에서 google authenticator를 사용하거나, authy를 사용하거나 상관없다.
내 경우는 authy를 사용해서 테스트 했고, 정상적으로 등록 가능했다.
그리고, 다시 OVPN 파일을 클라이언트로에 다운로드 하자.
OTP 설정 이전의 프로파일은 클라이언트로부터 삭제하자.
새로 받은 프로파일을 사용하여 VPN 접속을 시도하면,
이제 기존의 id/password와 함께 OTP도 함께 묻는 것을 확인할 수 있다.
DRBD, Pacemaker, Corosync + PostgreSQL 환경에서 Failover시 Unmanaged라고 뜬다면?
DRBD, Pacemaker, Corosync기반으로 H/A 환경을 구축하고, 그 위에 PostgreSQL을 실행시켰는데
H/A failover가 정상적으로 되는지 확인하기 위해 다음과 같은 테스트를 수행하였다.
1. Postgres kill 시키기 : auto restart
2. Virtual IP용 NIC 강제로 ifdown : fail over
3. crm node standby 명령어 실행을 통한 강제 switch over
위의 테스트를 트래픽이 없거나(적은) 환경에서는 별 문제 없이 수행할 수 있었는데,
트래픽을 많이 발생시킨 (heavy transaction) 환경에서는 기대와는 다르게 동작하는 것을 확인하였다.
그 에러 메시지가 crm_mon 명령어로 확인했을 때, PostgreSQL이 정상적으로 동작하지 않으면서 “Unmanaged”
라고 뜨는 것이었다.
이를 위해 crm resource edit를 하여,
PostgreSQL 리소스의 정보를 아래와 같이 수정하였다.
op monitor role=Started timeout=120 interval=30 depth=0 \
op start role=Stopped interval=0 timeout=120s \
op stop role=Started interval=0 timeout=120s
모니터링, 시작, 종료시 interval과 timeout을 부여했는데,
특히 timeout의 값을 120초로 주었다.
만약, 이보다 더 작은 값으로 지정한다면 edit 종료시, crm shell에서 사실 “default보다 작은 값을 지정했다”면서
경고 메시지를 준다.
경고를 무시하면, 이와 같이 Unmanaged라는 상황을 만날 수 있다.
교훈)
테스트 환경 구축만으로 잘 되었다고 생각하면, 트래픽이 발생하는 운영 상황에서 auto failover가 안되는 수가 있다.
Pacemaker, Corosync, DRBD 기반으로 구성했는데, failover가 안된다?
1.
만약, 이전까지 잘 되던 failover가 갑자기 되지 않는다던지,
어느 정도 부하가 걸린 환경에서, failover까지는 정상적으로 수행했으나,
failback을 시도했더니 정상적으로 수행되지 않는다면?
2.
crm_mon 명령어로 조회하면, 등록했던 리소스에 문제가 있는지/없는지 확인할 수 있다.
때때로, crm_mon 명령어로는 문제점이 나타나지 않는데도 failover가 되지 않는다면?
이럴 떄는 특정 리소스의 failcount가 INFINITY로 바뀌어 있는 경우가 있다.
이 값을 0으로 변경해 줘야 다시 failover가 정상 동작한다.
failcount를 조회하려면 다음과 같이 수행할 수 있다.
crm resource failcount 리소스명 show 노드명
이렇게 조회했더니, 특정 리소스의 failcount가 INFINITY로 나타난다면?
다음과 같이 failcount를 리셋한다.
crm resource cleanup 리소스명
그런데,
에러 메시지를 없애고자, crm resource cleanup 자원명을 수행했는데도,
failover가 되지 않는다면?
설정된 모든 노드에서 각각 failcount를 조회해보자.
각 노드에 등록된 리소스들의 failcount들 중, INFINITY가 존재한다면, 해당 노드에서 cleanup을 수행한다.
그리고 나서, 다시 failover 상황에서 검증한다.
맥에서 마우스 스크롤 방향 반대로 하려면
맥에서 마우스를 쓰다보면, 스크롤 방향이 반대인데 윈도우즈만 쓰던 나로서는 여간 헷갈리는 것이 아니다.
역시 검색의 힘!
시스템 환경설정 > 마우스 > 스크롤방향 : 자연스럽게
를 토글해준다. 끝.
장마, 장마전선
위키피디아로부터 찾아낸 바에 따르면,
장마 = 장(長) + 마(맣; 물) 이라고 한다.
결국, 오래 내리는 비라는 어원을 가지고 있다고 하는데, 뉴스를 보다 장마전선을 영어로 뭐라 하면 좋을지 찾아보았다.
사전에서는, a seasonal rain front 라고 하고 있다.
장마는,
monsoon, rainy season 등으로 쓸 수도 있는데,
사전을 좀 더 찾아보니, rainy spell 이라고도 하는 것을 발견했다.
예전에 한파를 cold spell이라고 했던 것과 비슷하네.
DRBD, Pacemaker, Corosync 기반 PostgreSQL H/A 구성환경 설정
1. 개요
(1) 환경 구성
1) VM 2개(node 설정용, 필수, VirtualBox/VMWare 사용) + 1개(테스트용, 선택)
2) CentOS 6.4 (64bits)
(2) 노드별 사전 준비사항
1) NIC : 2개 (VMWare/VirtualBox 관리 메뉴에서 추가)
2) 별도 하드 파티션 (DRBD 전용) 설정 (VMWare/VirtualBox 관리 메뉴에서 추가)
(3) 주요 설치 순서
1) 노드 네트워크 설정
2) DRBD 전용 파티션 설정
3) PostgreSQL 설치
4) Pacemaker, Corosync, DRBD, Heartbeat 설치
5) DRBD 환경설정
6) postgreSQL + DRBD 동작확인
7) corosync 환경설정
8) corosync 동작 확인
9) pacemaker 환경설정 (리소스 등록/관리)
10) 실행 검사
2. 설치/ 환경설정
(1) 표기/참고
제목 뒤에 해당 노드를 표기하고, 모든 노드에서 동일하게 수행해야 하는 작업은 both로 표기한다.
초기 환경 설정/ 프로그램 설치까지 중복되는 작업일 수 있으므로, 한 vm에 어느 정도 설정을 한 후 clone하는 것이 더 편리할 수 있다.
본 설치 예제에서는, node1.mycluster, node2.mycluster라는 이름으로 노드를 구성하였다.
(2) 설치 전 환경 설정 (both)
1) VMWare/VirtualBox 메뉴상 설정
– Network Interface를 각 노드별 1개씩 추가한다.
– Hard disk를 각 노드별 1개씩 추가한다. 이후, 부팅하여 fdisk -l로 확인하면, 추가된 디스크가 /dev/sdb 등과 같이 나타날 것이다.
새로 추가한 /dev/sdb를 향후 DRBD 전용으로 사용한다.
2) 네트워크 대역 구성
– LAN : 10.0.0.x (DB의 virtual IP도 이 대역으로 할당)
– Crossover : 172.16.0.x (두 노드 간의 통신 신뢰도 및 성능 향상을 위해 구성)
3) 노드 구성
전체 노드는 다음과 같이 구성하였다.
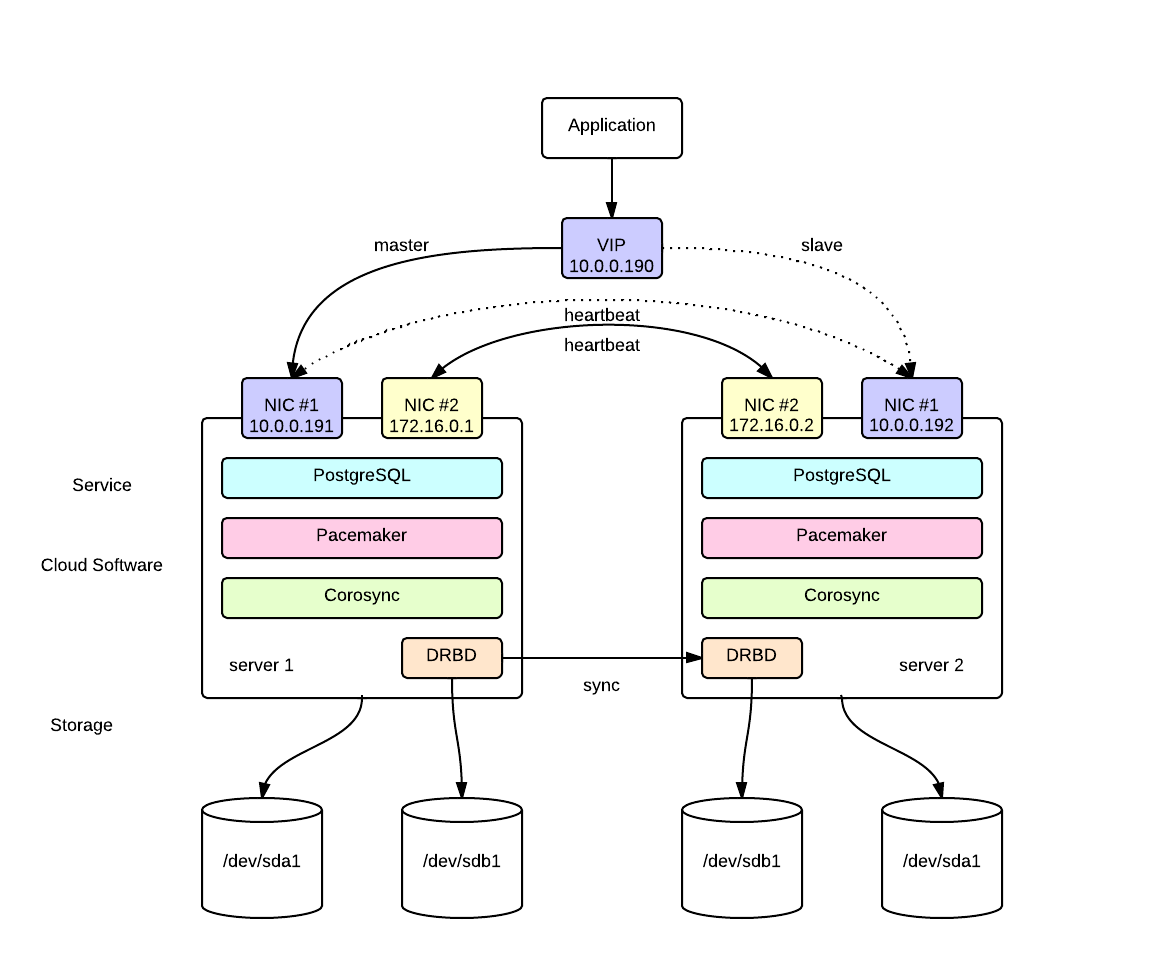
* node1
– node1.mycluster : 10.0.0.191 (LAN), 172.16.0.1 (cross)
* node2
– node2.mycluster : 10.0.0.192 (LAN), 172.16.0.2 (cross)
* DB virtual IP (상황에 따라 active node로 설정 변경됨)
– dbip.mycluser : 10.0.0.190
* 실제 application이 접속하게 되는 IP address
(3) 노드 기본 설정(특별한 언급이 없는 한, root 계정에서 실행)
1) SELINUX 설정 해제 (both)
getenforce
를 실행하여, SELINUX가 활성/해제 상태인지 확인한다. Enforcing으로 출력된다면, 활성화된 상태이므로,
vi /etc/selinux/config
SELINUX=disabled
라고 변경한다.
2) hostname 지정
vi /etc/sysconfig/network
[node1]
NETWORKING=yes
NETWORKING_IPV6=no
HOSTNAME=node1.mycluster
GATEWAY=10.0.0.9 (네트워크 구성상의 GW)
[node2]
NETWORKING=yes
NETWORKING_IPV6=no
HOSTNAME=node1.mycluster
GATEWAY=10.0.0.9 (네트워크 구성상의 GW)
3) network 설정 (node1, node2 각각)
vi /etc/sysconfig/network-scripts/ifcfg-eth0
DEVICE=eth0
BOOTPROTO=static
IPADDR=10.0.0.191 (node2의 경우 10.0.0.192)
NETMASK=255.255.255.0
ONBOOT=yes
HWADDR=시스템설정값사용(VMWare/VirtualBox)
vi /etc/sysconfig/network-scripts/ifcfg-eth1
DEVICE=eth1
BOOTPROTO=static
IPADDR=172.16.0.1 (node2의 경우 172.16.0.2)
NETMASK=255.255.255.0
ONBOOT=yes
HWADDR=시스템설정값사용(VMWare/VirtualBox)
vi /etc/hosts (both)
10.0.0.190 dbip.mycluster dbip
10.0.0.191 node1.mycluster node1
10.0.0.192 node2.mycluster node2
(4) 프로그램 설치 (postgreSQL, pacemaker, corosync, DRBD)
1) 관련 패키지 설치 (both)
yum install gcc gcc-c++ make autoconf wget readline readline-devel zlib zlib-devel openssl openssl-devel gettext gettext-devel python python-devel
2) postgres 사용자 생성/설정 (both)
useradd -d /home/postgres postgres
passwd postgres
su - postgres
vi .bash_profile
아래 내용을 복사하고, 저장
PATH=$PATH:$HOME/bin
POSTGRES_HOME=/usr/local/pgsql
PGLIB=$POSTGRES_HOME/lib
PGDATA=/var/lib/pgsql/data
PATH=$POSTGRES_HOME/bin:$PATH

export PATH
export POSTGRES_HOME
export PGLIB
export PGDATA

LD_LIBRARY_PATH=$PGLIB
export LD_LIBRARY_PATH
3) postgresql 설치 (both)
postgresql 을 공식 사이트로부터 다운로드 하여,
/usr/local/src로 복사
tar -jxf postgresql-9.3.4.tar.bz2
cd /usr/local/src/postgresql-9.3.4
./configure --prefix=/usr/local/pgsql --enable-depend --enable-nls=ko --with-python
make
make install
4) pacemaker, corosync 설치 (both)
CentOS6.x에서는 pacemaker와 corosync 설치를 위해 별도의 yum repository를 추가할 필요가 없다. (이전 버전에서는 필요)
yum install pacemaker corosync
5) DRBD 설치
아래와 같이 ELREPO를 추가한 후,
rpm -Uvh http://mirror.web24.net.au/elrepo/elrepo/el6/x86_64/RPMS/elrepo-release-6-5.el6.elrepo.noarch.rpm

yum install drbd84-utils kmod-drbd84 heartbeat
또는
heartbeat-3.0.4-2.el6.x86_64.rpm
heartbeat-libs-3.0.4-2.el6.x86_64.rpm
kmod-drbd84-8.4.4-1.el6.elrepo.x86_64.rpm
drbd84-utils-8.4.4-2.el6.elrepo.x86_64.rpm
을 복사/직접 설치한다.
(4) DRBD 설정
1) DRBD 환경설정 (both)
vi /etc/drbd.conf
# You can find an example in /usr/share/doc/drbd…/drbd.conf.example
와 같은 문구가 보인다.
해당 디렉토리를 찾아가서 보면, drbd.conf.example이 존재하고, 다양한 설정 방법에 대한 예를 볼 수 있다.
include "drbd.d/global_common.conf";
include "drbd.d/*.res";
라는 문구가 보이는 것처럼,
drbd.d 디렉토리 내에, postgres용 환경설정 파일을 만들어놓고 include 시키면 된다.
/etc/drbd.d/postgres.res
resource postgres {
startup {
wfc-timeout 30;
outdated-wfc-timeout 20;
degr-wfc-timeout 30;
}

net {
cram-hmac-alg sha1;
shared-secret sync_disk;
}

syncer {
rate 100M;
verify-alg sha1;
}

on node1.mycluster {
device      /dev/drbd0;
disk        /dev/sdb;
address     172.16.0.1:7791;
meta-disk   internal;
}
on node2.mycluster {
device      /dev/drbd0;
disk        /dev/sdb;
address     172.16.0.2:7791;
meta-disk   internal;
}
}
위 설정은 앞서 추가한 디스크인 /dev/sdb를 각각 논리 디바이스 /dev/drbd0으로 매핑하여 사용하도록 한다. DRBD는 7791 포트를 통해 통신하도록 설정하였으므로, 양 노드에서 방화벽 등록을 해준다.
vi /etc/sysconfig/iptalbes

-A INPUT -m state --state NEW -m tcp -p tcp --dport 7791 -j ACCEPT
2) meta data 생성 (both)
앞서 선언한 resource인 postgres라는 이름으로 meta data를 생성한다.
drbdadm create-md postgres
만약, postgres라는 이름의 리로스가 없다고 뜬다면, 호스트이름과 on 뒤에 선언한 node 이름들이 일치하는지 확인한다.
혹은
drbdadm create-md all
이라고 실행시키면, 선언된 resource들에 대해 메타 데이터를 생성하려 시도하는데, 문제가 되는 부분을 좀 더 자세하게 출력해 준다. (예: on 부분에 선언된 hostname이 없거나, 오타가 의심된다는 등)
즉, on 뒤에 기록한 host이름과
uname -n
으로 조회한 이름이 일치해야 한다.
정상적으로 실행된다면,
Writing meta data...
initializing activity log
NOT initializing bitmap
New drbd meta data block successfully created.
과 같은 메시지가 출력된다.
3) DRBD 서비스 시작 (both)
service drbd start
정상적으로 실행되면, 다음과 같은 메시지가 출력된다.
Starting DRBD resources: [
create res: postgres
prepare disk: postgres
adjust disk: postgres
adjust net: postgres
]
4) Disk Sync (node1)
두 노드를 강제로 동기화 시킨다.
drbdadm -- --overwrite-data-of-peer primary all
양 노드에서 아래와 같이 실행시켜보면, 동기화 진행상태를 확인할 수 있다.
[node1]
cat /proc/drbd
version: 8.4.4 (api:1/proto:86-101)
GIT-hash: 599f286440bd633d15d5ff985204aff4bccffadd build by phil@Build64R6, 2013-10-14 15:33:06
0: cs:SyncSource ro:Primary/Secondary ds:UpToDate/Inconsistent C r—n-
ns:44960 nr:0 dw:0 dr:48608 al:0 bm:2 lo:0 pe:7 ua:4 ap:0 ep:1 wo:f oos:8345308
[>………………..] sync’ed: 0.6% (8148/8188)M
finish: 0:09:39 speed: 14,336 (14,336) K/sec
[node 2]
cat /proc/drbd
version: 8.4.4 (api:1/proto:86-101)
GIT-hash: 599f286440bd633d15d5ff985204aff4bccffadd build by phil@Build64R6, 2013-10-14 15:33:06
0: cs:SyncTarget ro:Secondary/Primary ds:Inconsistent/UpToDate C r—–
ns:0 nr:137472 dw:137448 dr:0 al:0 bm:8 lo:3 pe:5 ua:2 ap:0 ep:1 wo:f oos:8250868
[>………………..] sync’ed: 1.7% (8056/8188)M
finish: 0:08:59 speed: 15,272 (15,272) want: 31,720 K/sec
동기화가 일단 100%가 될 때까지 기다린다.
5) DRBD 동기화 간단 테스트
[시나리오]
– node1에서 DRBD용 디렉토리 마운트
– 해당 디렉토리에 임의의 파일 생성
– node1을 primary -> secondary로 변경
– node2를 secondary -> primary로 변경
– DRBD 디렉토리를 마운트하여 확인
[node1]
mkfs.ext4 /dev/drbd0
mkdir /mnt/test
mount /dev/drbd0 /mnt/test
cd /mnt/test
touch a
cd ..
umount /mnt/test
drbdsetup /dev/drbd0 secondary
[node2]
mkdir /mnt/test
drbdsetup /dev/drbd0 primary
mount /dev/drbd0 /mnt/test
cd /mnt/test
ls -al
(5) PostgreSQL on DRBD 테스트
1) PostgreSQL 디렉토리 설정 (node1)
각 노드에서 모두 drbd를 시작시킨다.
service drbd start
node1이 primary로 정상적으로 동작하는지 확인한다.
cat /proc/drbd
version: 8.4.4 (api:1/proto:86-101)
GIT-hash: 599f286440bd633d15d5ff985204aff4bccffadd build by phil@Build64R6, 2013-10-14 15:33:06
0: cs:Connected ro:Primary/Secondary ds:UpToDate/UpToDate C r—–
ns:8388320 nr:0 dw:4 dr:8388997 al:1 bm:512 lo:0 pe:0 ua:0 ap:0 ep:1 wo:f oos:0
postgresql에서 사용할 디렉토리를 지정/설정한다.
mkdir /var/lib/pgsql
mount -t ext4 /dev/drbd0 /var/lib/pgsql
chwon postgres.postgres /var/lib/pgsql
2) PostgreSQL DB 초기화 (node1)
postgresql DB를 다음과 같이 초기화한다.
su - postgres
initdb /var/lib/pgsql/data
다음과 같은 메시지가 출력될 것이다.
The files belonging to this database system will be owned by user “postgres”.
This user must also own the server process.
The database cluster will be initialized with locale “en_US.UTF-8”.
The default database encoding has accordingly been set to “UTF8”.
The default text search configuration will be set to “english”.
Data page checksums are disabled.
creating directory /var/lib/pgsql/data … ok
creating subdirectories … ok
selecting default max_connections … 100
selecting default shared_buffers … 128MB
creating configuration files … ok
creating template1 database in /var/lib/pgsql/data/base/1 … ok
initializing pg_authid … ok
initializing dependencies … ok
creating system views … ok
loading system objects’ descriptions … ok
creating collations … ok
creating conversions … ok
creating dictionaries … ok
setting privileges on built-in objects … ok
creating information schema … ok
loading PL/pgSQL server-side language … ok
vacuuming database template1 … ok
copying template1 to template0 … ok
copying template1 to postgres … ok
syncing data to disk … ok
WARNING: enabling “trust” authentication for local connections
You can change this by editing pg_hba.conf or using the option -A, or
–auth-local and –auth-host, the next time you run initdb.
Success. You can now start the database server using:
postgres -D /var/lib/pgsql/data
or
pg_ctl -D /var/lib/pgsql/data -l logfile start
3) hba(host based authentication) file 편집
node1, node2, db virtual ip을 추가한다.
vi /var/lib/pgsql/data/pg_hba.conf
host all all 10.0.0.190/32 trust
host all all 10.0.0.191/32 trust
host all all 10.0.0.192/32 trust
4) postgresql.conf 편집
vi /var/lib/pgsql/data/postgresql.conf
listen_addresses = '*'
로 변경하고, 주석을 해제한다.
port=5432
의 값을 원하는 포트로 변경하고,주석을 해제한다. (당연히 기본값을 그대로 사용해도 됨)
5) start script 작성 (both)
cp /usr/local/src/postgresql-9.3.4/contrib/start-scripts/linux /etc/init.d/postgresql
chmod 775 /etc/init.d/postgresql
postgresql 파일의 내용 중, 디렉토리 등의 설정을 자신의 설치환경에 맞게 변경한다. (예: PGDATA, PGUSER 등)
6) 계정 생성/샘플 데이터 준비 (node1)
suser라는 super user 계정을 생성하고, test 데이터베이스를 생성한다.
su - postgres
createuser --superuser suser --pwprompt

psql -U suser -d postgres
postgres=# create database test;
postgres=# \q

psql -U suser -d test
test=# create table department (
id int primary key not null,
dept char(50) not null,
emp_id int not null
);

test=# insert into department(id, dept, emp_id) values(1, 'sales', 100);

test=# select * from department;
id |                        dept                        | emp_id
----+----------------------------------------------------+--------
1 | sales                                              |    100

test=# \q
7) PostgreSQL on DRBD 테스트
[node1]
postgreSQL을 내린다.
service postgresql stop
DRBD 디바이스를 언마운트시키고, 현재 노드를 primary -> secondary로 전환시킨다.
umount /dev/drbd0
drbdadm secondary postgres
[node2]
위 작업의 역순으로 실행하여, node2에서 postgreSQL이 DRBD 기반으로 동작하는지 확인한다.
drbdadm primary postgres
위 명령어를 수행하기 전에는
cat /proc/drbd
version: 8.4.4 (api:1/proto:86-101)
GIT-hash: 599f286440bd633d15d5ff985204aff4bccffadd build by phil@Build64R6, 2013-10-14 15:33:06
0: cs:Connected ro:Secondary/Secondary ds:UpToDate/UpToDate C r—–
ns:0 nr:8437416 dw:8437416 dr:0 al:0 bm:512 lo:0 pe:0 ua:0 ap:0 ep:1 wo:f oos:0
수행 후에는
cat /proc/drbd
version: 8.4.4 (api:1/proto:86-101)
GIT-hash: 599f286440bd633d15d5ff985204aff4bccffadd build by phil@Build64R6, 2013-10-14 15:33:06
0: cs:Connected ro:Primary/Secondary ds:UpToDate/UpToDate C r—–
ns:0 nr:8437416 dw:8437416 dr:664 al:0 bm:512 lo:0 pe:0 ua:0 ap:0 ep:1 wo:f oos:0
이제, DRBD device를 마운트하고 postgresql을 시작시킨다.
mkdir /var/lib/pgsql
mount -t ext4 /dev/drbd0 /var/lib/pgsql

service postgresql start
node1에서 작업한 내용을 확인하자.
su - postgres
psql -U suser -d test
test=# select * from department;
id |                        dept                        | emp_id
----+----------------------------------------------------+--------
1 | sales                                              |    100
8) 테스트 환경 원복
앞서 테스트하느라 변경한 상태를 corosync 설정을 하기에 앞서 원래대로 돌려 놓자.
마지막에 테스트를 node2에서 수행했으므로, node2부터 변경한다.
[node2]
service postgresql stop
umount /dev/drbd0
drbdadm secondary postgres
[node1]
drbdadm primary postgres
[both]
DRBD나 postgreSQL은 이후, Pacemaker를 통해 시작/종료 등 관리할 것이므로, 자동 시작되지 않도록 설정을 변경한다.
service drbd stop
chkconfig --level 35 drbd off
chkconfig --level 35 postgresql off
(6) Corosync 환경설정
1) 기본 설정 (both)
cp /etc/corosync/corosync.conf/example /etc/corosync/corosync.conf

vi /etc/corosync/corosync.conf
compatibility: whitetank

totem {
version: 2
secauth: off
threads: 0
interface {
ringnumber: 0
bindnetaddr: 172.16.0.0
mcastaddr: 226.94.1.1
mcastport: 5405
ttl: 1
}
}

logging {
fileline: off
to_stderr: no
to_logfile: yes
to_syslog: yes
logfile: /var/log/cluster/corosync.log
debug: off
timestamp: on
logger_subsys {
subsys: AMF
debug: off
}
}

amf {
mode: disabled
}

aisexec {
user: root
group: root
}

service {
# Load the Pacemaker Cluster Resource Manager
name: pacemaker
ver: 0
}
매뉴얼에 따르면, corosync가 사용하는 multicast 포트 설정은 설정값 – 1을 사용하여, send/receive에 사용한다고 한다. 즉, 5405 포트를 선언하면, 5404 포트도 필요하다.
방화벽 룰에 추가한다.
vi /etc/sysconfig/iptables
-A INPUT -m state --state NEW -m udp -p udp --dport 5404 -j ACCEPT
-A INPUT -m state --state NEW -m udp -p udp --dport 5405 -j ACCEPT
변경 사항을 저장하고,
mkdir /var/log/cluster
serivce iptables restart
service corosync start
모든 노드로부터
crm_mon -1
을 실행했을 때,
Last updated: Thu May 15 22:43:41 2014
Last change: Thu May 15 22:41:25 2014 via crmd on node1.mycluster
Stack: classic openais (with plugin)
Current DC: node1.mycluster – partition with quorum
Version: 1.1.10-14.el6-368c726
2 Nodes configured, 2 expected votes
0 Resources configured
Online: [ node1.mycluster node2.mycluster ]
등과 같이 조회되어야 한다.
양 노드에 corosync를 서비스로 항상 실행되도록 설정한다.
chkconfig --level 35 corosync on
(7) Pacemaker 설정
1) crmsh 설치
예전 버전의 pacemaker, corosync 설치를 했다면 crmsh이 기본적으로 설치되어 있을 것이다.
최신 버전의 패키지들은 기본적으로 pcs 를 활용하여, 설치를 가이드하고 있다.
그러나, 아직 레퍼런스가 crm을 사용하는 경우가 많으므로, crm을 설치해서 진행하도록 한다. crm을 써서 pacemaker 리소스를 관리하려면, 별도로 crmsh를 찾아서 설치해 줘야 한다.
wget -P/etc/yum.repos.d/ http://download.opensuse.org/repositories/network:/ha-clustering:/Stable/CentOS_CentOS-6/network:ha-clustering:Stable.repo

yum install crmsh.x86_64
와 같이 하거나, 해당 리파지토리로부터
pssh-2.3.1-3.3.x86_64.rpm
crmsh-2.0+git46-1.1.x86_64.rpm
을 받아서 직접 설치해 줘야 한다.
2) 클러스터 일반 설정 (node1)
crm configure property stonith-enabled=false
crm configure property no-quorum-policy=ignore
crm configure rsc_defaults resource-stickiness=100
3) 클러스터 리소스 설정 (node1)
클러스터에 등록하는 FileSystem(DRBD), DBIP, Postgres 등등 모두가 클러스터의 리소스로 인식된다. 이들을 모두 등록한다.
[DBIP]
crm configure primitive DBIP ocf:heartbeat:IPaddr2 params ip=10.0.0.190 cidr_netmask=24 op monitor interval=30s
crm_mon -1
로 등록 상태를 확인하면, 아래와 같이 등록된 리소스를 확인할 수 있다.
Last updated: Fri May 16 01:16:13 2014
Last change: Fri May 16 01:14:57 2014 via cibadmin on pstg04
Stack: classic openais (with plugin)
Current DC: node1.mycluster – partition with quorum
Version: 1.1.10-14.el6-368c726
2 Nodes configured, 2 expected votes
1 Resources configured
Online: [ node1.mycluster node2.mycluster ]
DBIP (ocf::heartbeat:IPaddr2): Started node1.mycluster
[DRBD on cluster] (node1)
이어서, DRBD 설정도 순서대로 진행한다.
crm configure primitive drbd_postgres ocf:linbit:drbd params drbd_resource="postgres" op monitor interval="15s"

crm configure ms ms_drbd_postgres drbd_postgres meta master-max="1" master-node-max="1" clone-max="2" clone-node-max="1" notify="true"

crm configure primitive postgres_fs ocf:heartbeat:Filesystem params device="/dev/drbd0" directory="/var/lib/pgsql" fstype="ext4"
[PostgreSQL on cluster] (node1)
PostgreSQL도 리소스로 등록해준다.
crm configure primitive postgresql ocf:heartbeat:pgsql op monitor depth="0" timeout="30" interval="30"
[Resource Grouping]
PostgreSQL과 관련하여 등록한 리소스들을 그룹으로 묶어주고, 순서를 부여한다.
crm configure group postgres postgres_fs DBIP postgresql

crm configure colocation postgres_on_drbd inf: postgres ms_drbd_postgres:Master

crm configure order postgres_after_drbd inf: ms_drbd_postgres:promote postgres:start

crm configure location master-prefer-node1 DBIP 50: node1.mycluster
[Pacemaker 추가 설정]
이 상태에서 곧바로 crm_mon -1 을 수행하면, 설정 과정 중 발생했던 failed actions 메시지들이 그대로 남게 된다.
crm resource cleanup resource명
명령어를 수행하여 해당 fail message를 지워 줄 수 있다.
일단 reboot 하고, 정상적으로 동작하는지 확인한다.
그리고 나서, 정상적으로 동작하면 다행인데, 위의 설정을 그대로 따랐다면, 보통 pacemaker에서 에러가 발생한다.
vi /usr/lib/ocf/resource.d/heartbeat/pgsql
파일을 열어 보자.
OCF_RESKEY_pgctl_default=/usr/bin/pg_ctl
OCF_RESKEY_psql_default=/usr/bin/psql
결국, postgreSQL을 설치한 위치가 달라서 pacemaker가 postgreSQL을 시작/중지 등을 시킬 수 없다는 에러가 발생할 것이다.
위 옵션의 경로에 지정된 디렉토리를 실제 설치된 곳으로 변경해주거나, 해당 디렉토리에 symbolic link를 생성해 주자.
crm_mon -1
을 수행하여, 해당 노드/ 리소스가 정상적으로 동작하는지 확인한다.
상태는 아래와 같이
Last updated: Fri May 16 03:27:27 2014
Last change: Fri May 16 01:31:08 2014 via cibadmin on node1.mycluster
Stack: classic openais (with plugin)
Current DC: node1.mycluster – partition with quorum
Version: 1.1.10-14.el6-368c726
2 Nodes configured, 2 expected votes
5 Resources configured
Online: [ node1.mycluster node2.mycluster ]
Master/Slave Set: ms_drbd_postgres [drbd_postgres]
Masters: [ node1.mycluster ]
Slaves: [ node2.mycluster ]
Resource Group: postgres
postgres_fs (ocf::heartbeat:Filesystem): Started node1.mycluster
DBIP (ocf::heartbeat:IPaddr2): Started node1.mycluster
postgresql (ocf::heartbeat:pgsql): Started node1.mycluster
정상적으로 보이지만, 사실은 DRBD가 정상 상태가 아닐 수도 있다.
cat /proc/drbd
를 통해 두 노드가 정상적으로 동기화 되고 있는지 반드시 확인한다.
상태가 Primary/Secondary 혹은 Secondary/Primary로 출력되는지 확인한다. 만약, Unknown 메시지가 보인다면, DRBD가 동기화 되고 있지 않다는 뜻이다.
4) 동작 확인
일단 동작하는 노드를 확인하려면 다음과 같이 수행한다.
crm_mon -1
VirtualIP로 동작하는 것을 확인하고, Remote로 직접 접속하여, 앞서 수행한 것과 동일한 테스트를 해보자.
psql -h 10.0.0.190 -U suser -d test

test=# select * from test; (node1에서 실행됨)
id |                        dept                        | emp_id
----+----------------------------------------------------+--------
1 | sales                                              |    100
이 상태에서 primary를 내리면, secondary 노드가 대신 동작하는지 확인한다.
primary로부터 (node1)
crm node standby
앞서 맺어놓은 세션은 일단 끊길 것이나,
test=# select * from test;

FATAL: terminating connection due to administrator command
FATAL: terminating connection due to administrator command
The connection to the server was lost. Attempting reset: Succeeded.
세션을 다시 맺고 실행하면 정상 동작하는 것을 확인할 수 있다.
test=# select * from test; (node2에서 실행됨)
id |                        dept                        | emp_id
----+----------------------------------------------------+--------
1 | sales                                              |    100
결과는 동일하지만, 접속한 노드는 node1 → node2로 변경되었다.
5) Spit Braing (DRBD 동기화 깨지는 경우)
DRBD의 동기화 상태가 깨진 상태를 Split Brain이라 한다. 보통 데이터 확인 후 수동으로 복구하는 것을 권장하나, 자동 복구를 위한 설정도 가능하다. DRBD에서는 다음과 같은 옵션이 설정 가능하다.
– discarding modifications made on the younger primary
– discarding modifications made on the older primary
– discarding modifications on the primary with fewer changes
– graceful recovery from split brain if one host has had no intermediate changes
수동으로 작업하는 경우, 보통 아래의 작업을 수행하면 된다.
drbdadm -- --discard-my-data connect 리소스명
drbdadm disconnect 리소스명
drbdadm connect 리소스명
의 작업을 원하는 노드에서 선별적으로 수행하면, 보통 DRBD 세션은 붙게 된다.
만약, 위의 명령어로도 해결이 안 된다면,
drbdadm invalidate 리소스명
을 수행한 후, 재접속 시도를 시키면 될 것이다.
그러나, 실제 운영환경에서는 위와 같은 명령어를 수행하기에 앞서, 데이터 손실 여부/ 어떤 노드를 기준으로 삼고 동기화를 진행시킬지 적절한 의사 판단이 필요할 것이다.
6) Corosync 채널 이중화 설정
vi /etc/corosync/corosync.conf
rrp_mode : active로 선언하고,
interface를 추가로 선언하고,
해당 port 및 port -1 에 대해 방화벽 룰을 추가해 준다.
compatibility: whitetank

totem {
version: 2
secauth: off
threads: 0
rrp_mode: active
interface {
ringnumber: 0
bindnetaddr: 172.16.0.0
mcastaddr: 226.94.1.1
mcastport: 5405
ttl: 1
}

interface {
ringnumber: 1
bindnetaddr: 10.0.0.0
mcastaddr: 227.94.1.1
mcastport: 5407
ttl: 1
}
}

logging {
fileline: off
to_stderr: no
to_logfile: yes
to_syslog: yes
logfile: /var/log/cluster/corosync.log
debug: off
timestamp: on
logger_subsys {
subsys: AMF
debug: off
}
}

amf {
mode: disabled
}

aisexec {
user: root
group: root
}

service {
# Load the Pacemaker Cluster Resource Manager
name: pacemaker
ver: 0
}
7) DRBD의 채널 이중화 가능성
확인한 바로는 DRBD의 통신 채널을 이중화할 수 있는 옵션은 없는 듯 하다. 결국, Corosync 등의 통신 채널을 이중화 하더라도, DRBD 채널에 문제가 생긴다면(split brain) 앞서 설명한 바와 같이 DRBD 동기화는 자동/수동으로 별도로 맞춰야 할 것이다.
